
The Art of the Self-Portrait: How to Capture 'You' (Even for a Passport)
A Creative Hack by: The ishotaphoto Team
We take countless photos, but passport, ID, and visa photos represent us for years. Many people want to look like themselves and actually like these official photos. This article shows how professional portrait techniques—like lighting, framing, and expression - help you create an official photo that truly captures you.
What’s usually wrong with official photos?
· Facial expression is usually the number one issue—people often look tense, forced, or uncomfortable because of the strict requirements and the pressure to 'look right.' They also typically have just 1 try to get the photo they want, whether they do it at the DMV, a USPS office, or another official location.
· Lighting conditions - the studio photo often feels “artificial”, with cold white light straight into the face and “plastic” skin texture. Poor lighting can add years to your face, cause shadows where they shouldn’t be, and alter your skin tone.
· Serious waste of time and money - for example, at CVS (one of the most popular and accessible options across the country), the cost of a passport photo is $17.99 + tax. Not to say, the photo counter is often empty, and the average wait time for the assistant is 27 minutes.
So, why not just take your official photo at home?
It sounds like a great idea at first. After all, everyone has a smartphone and a blank wall, right? But, as always, the devil is in the details. Here are the most common issues people run into when trying to take an official photo at home:
· Lighting conditions (again!). Typical home lighting is rarely ideal for a professional-looking shot. It can be too dark, too bright, or—believe it or not—both at once. Imagine harsh sunlight pouring through a window on one side, with not enough light on the other, or a mix of artificial and natural lighting creating uneven tones and shadows.
· Lack of professional equipment. Most people snap photos by hand, which works for casual shots but can introduce subtle blur or artifacts from hand shake - even if you don’t notice it. These minor imperfections might not matter for Instagram, but could lead to a photo or visa rejection, wasting even more time.
· Inexperience with professional photo-taking. Few people know how to position the camera, pose themselves, or judge the perfect distance for an official portrait. Sure, you can take hundreds of shots and try to pick the best, but how do you actually decide which one is correct?
· Official requirements. Getting a good-looking photo is just step one. You also need to ensure the image fits the strict requirements—format, dimensions, file size, compression, and more. While this info is available online, sorting through it and using the right tools can be frustrating and time-consuming.
The good news? You don’t need special skills or equipment to take a great official photo at home. By following a few simple steps, you can dramatically improve your results and end up with a photo you’re truly happy with.
Rule #1 - good light is everything
Take your photo during the brightest part of the day (typically between 10am and 2pm). Find a room with big windows, but you should turn off all interior lights to avoid weird color tints. Most importantly, position your subject so they are facing the window. If the window is behind them, they’ll turn into a dark silhouette. Let that natural light hit them directly for a clean, professional look.
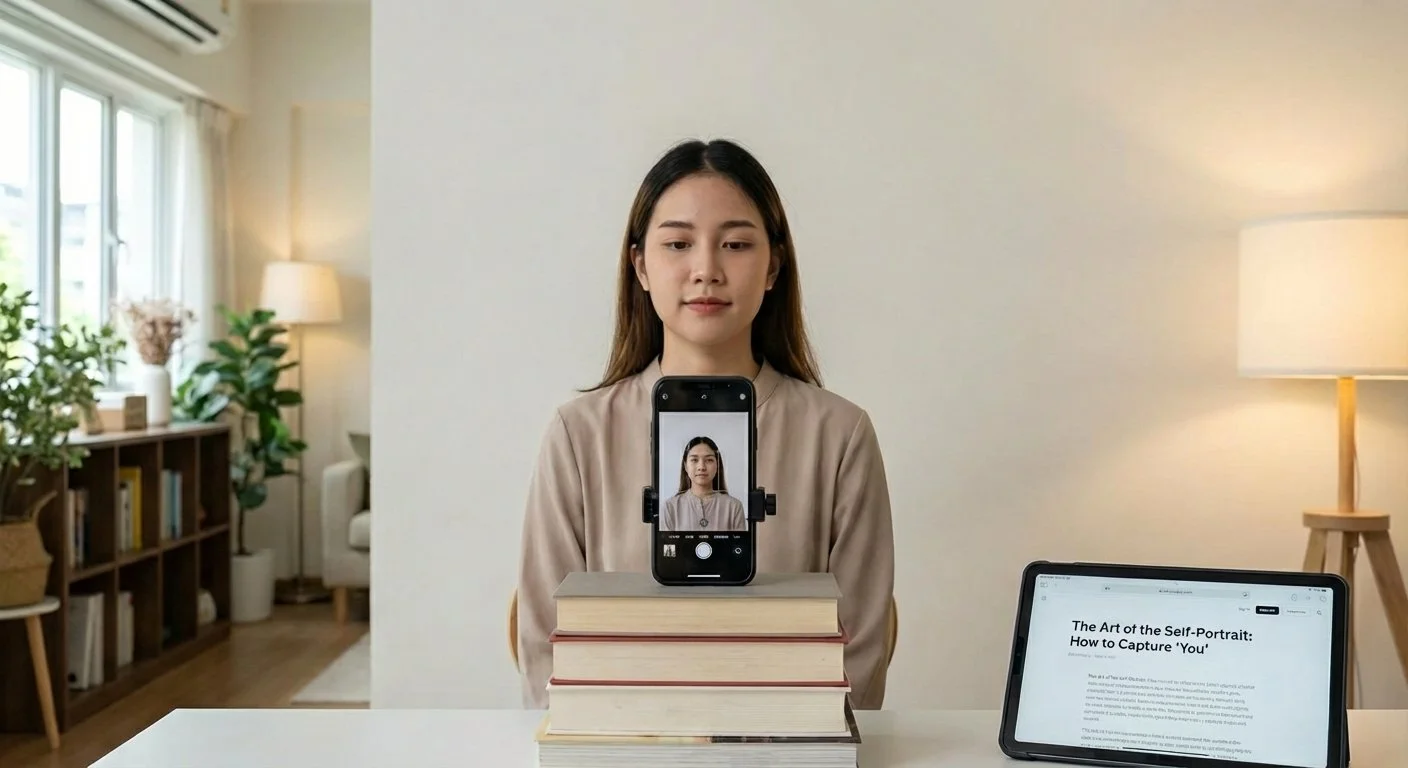
Rule #2 - make sure the camera is stable
Use the main camera on your device (for iPhones, that’s the back camera by default) for the highest quality photo. If you have a small tripod, use it; otherwise, prop your phone on a stable surface like a table, using a heavy cup or stack of books for support. Position the camera at about chest height - placing your phone on a chair or table (or both!) can help you get the right angle. It might not look glamorous, but a little creativity goes a long way when you’re aiming for a professional result at home.
Rule #3 - take 5 shots at most
Don’t overwhelm yourself by taking dozens of photos—it’ll only make it harder to choose the best one. Limit yourself to five shots, then use your phone’s built-in software to select the best photo (many phones can suggest the best photo using AI). Afterwards, use the “auto enhance” feature on your device to quickly correct lighting and white balance, ensuring your photo looks as professional as possible. If you’re using an iPhone, simply open the photo, tap “Edit,” and select “Auto” to let your device optimise the image. Be sure to apply and save your changes—don’t worry, you can always revert to the original version if needed.
Rule #4 - make sure it is compliant
Let’s say you are preparing your US visa photo. The first thing you need to do is google the official photo requirements (and make sure they are coming from the actual government source!). For the US Visa, for example, you are looking for the travel.gov visa photo requirements page. Also, sometimes government has several official pages, often with the contradictory requirements on them, so make sure to use the latest ones.
Once you know the required dimensions, face position, and size specifications, it’s time to crop your photo. The default iPhone editing tools don’t allow for precise cropping by pixel size, so you’ll need to either use a third-party app or, as shown in this example, the built-in tools on macOS. (Windows also comes with basic photo editing tools that allow you to crop by pixel size.) Here’s how to crop your photo to the exact dimensions using Preview on macOS:
1. Open the image in Preview
2. Press ⌘ + I → open the Inspector
3. In the selection tool, drag a rectangle
4. Look at the pixel dimensions of the selection in the Inspector
5. Adjust the selection edges until it shows exactly the size you need (e.g., 600×600px)
6. Go to Tools → Crop
Important: Before cropping, make sure your face occupies the precise amount of space required in the final photo. For a US visa, the current guidelines specify that your head should measure between 1 inch and 1 3/8 inches (22 mm–35 mm), or 50%–69% of the image’s total height (from the bottom of the chin to the top of the head). This means your head height should be around 300–400 pixels in the final image. It might take a few tries to get this right, but don’t worry—it’s straightforward once you understand the requirements.
Rule #5 - make your life a bit easier
As you can see, creating a high-quality document photo at home is entirely possible and easier than ever. The main challenge is to make sure your photo meets all the official requirements, which can involve extensive searching, converting measurements, and adjusting ratios. Fortunately, modern AI-powered tools can make this step almost effortless. Online services - like AI Document Photo Service - are already programmed with up-to-date document photo specifications and can handle the final adjustments for you in seconds. These platforms use advanced AI to detect faces, emotions, glasses, and lighting, automatically correct any issues, and crop your photo to the perfect size with impressive accuracy.
The final thoughts
With today’s technology, you no longer need to waste time waiting at CVS or struggle through endless googling and confusing official requirements. By combining the power of modern smartphones with advanced AI tools, you can quickly create the perfect passport, ID, or visa photo—and actually love how you look in it for years to come.
Author Bio:
The iShotAPhoto team brings over 50 years ofcombined experience in the visa, immigration, and travel industry. Our specialists have worked in embassies, travel startups, and professional immigration consultancies.